How about adding some mouthwatering madness to your March Madness this year with a steak platter?
Think about it - enjoying perfectly cooked steaks with an impressive charcuterie board and craft beer. Not only are steak platters a thing of majestic beauty, but they also give you everything you need, all sliced and ready to go, perfectly arranged an arm’s length away, waiting to be grabbed.
If you want to build a steak platter for your own enjoyment during March Madness, or for a viewing party hosted at your place, here is the “how to” to build the perfect steak platter to impress.
When building the ultimate steak platter, there are two things to keep in mind - taste and looks. Of course, taste is of the utmost importance, but, let’s be real, people also love pretty food, and a steak platter allows you so much flexibility when creating it. It’s also a great dish because it can be built as an intimate meal for 2, or it can be designed as the ultimate party platter, feeding lots of mouths and stretching the steak out.
How to Pick Out the Perfect Steak:
The first step, and one of the most important, is to pick out the perfect steak!
If you’re focused on presentation, USDA Prime Filets might be your go-to, as their lack of fat seams that run through those cuts make them preferable for presentation.
However, there are multiple cuts that would be absolutely delicious on a platter. It’s hard to go wrong. Whether you’re aiming for little fat and mostly flavor, the “melt in your mouth” moment cut of beef, or a combo of different cuts for different textures and flavors, we've got you covered with our guide to finding the perfect cut of steak.
Another thing to keep in mind is the quality of the meat. Be sure to choose prime beef for the utmost enjoyment. With prime beef, it requires no marinades or sauces for the texture and flavor of the meat to wow people. Check out why you should consider buying prime beef, and why it’s the top of the line when it comes to different beef grades.
How to Cook the Perfect Steak:
Cooking your steak correctly is just as important as picking out the perfect cut and grade of steak for your platter.
First is first - be sure to prepare ahead of time and thaw your steak correctly. You don’t want to cook it frozen and have the outside cook faster than the middle and end up with a slab of meat raw on the inside and tough on the outside. Be sure that you thaw your steak properly.
To cook it to ultimate perfection, there are multiple methods. Make sure that you cook it at the right temperature and for the right amount of time, for the level of doneness that you’re going for. Check out our guide on how long to cook your steak, and don’t forget to invest in an instant-read thermometer. It will be your steak’s best bud.
If you’re an outdoorsy person and love to grill, then light that grill up! Just make sure that you grill your steak properly, not overturning it or cooking it too long and making it tough.
If you want to switch it up, an on point method is reverse searing it. This can be done in the oven or on the grill, and it results in some of the juiciest steak with a perfect browned outer crust when done right.
When you’re done cooking your steak, be sure to let it rest for 5 minutes before slicing it up for the board (you don’t want to cut into it too soon and lose all those lovely juices), unless you choose the reverse sear method. Thinly slice it once it’s rested - the thinner it’s sliced, the easier it is for guests grabbing from the board to chew it!

What Sides to Shoot for:
You want to pair your steak with ingredients that bring out the best in it. Whatever sides you pick, just keep two things in mind. They should add color to the steak platter to “fancy” it up. They should also be a “palate-counterweight” to your steaks. They should add flavors and textures, but they shouldn’t clash with the main attraction - your steaks.
Possible Pairings for Your Board:
- Cheese
- Add a few high quality cheeses into the mix! Choose at least 2-3 cheeses, and make sure they have different flavors and textures (for example, choose a hard and a soft cheese, and maybe one in between). You can even purchase pre-selected cheese packages at some stores, which make it all the easier!
- Fruits and Nuts:
- These are great fillers if you have empty space somewhere on your board. Try some dried fruits or even some fresh seasonal ones. The saltiness of the nuts and the sweetness of the fruits will play off of each other amazingly. Also, olives (yes, they’re a fruit) are also a delectable option with their saltiness.
- Bread and Crackers:
- Bread, crackers, pita chips - whatever you choose, be sure to add at least two different ones. You need something to spread that cheese on, and these will help fill guests up and make the board stretch further. Toasted baguettes are always a delicious option to spread dips and cheeses on! If you’re using bread, be sure that it is pre-sliced and ready to grab.
- Condiments:
- Make it fun with creative condiments. The possibilities are endless - stone ground mustard, hummus, spicy jelly, fig jam, pesto, olive tapenades, bacon jam, horseradish cream, sriracha, the list can go on and on. These are what will really add some zest to your board.
- Veggies:
- You don’t need many, but feel free to throw in a few to go with dips and to add some color and pop to your platter (you can never go wrong with artichoke hearts).
On a side note, you can even put more extra seasonings out, like salt and pepper, so that everyone can custom season each bite if they wish to.
How to Assemble an Awesome Platter:
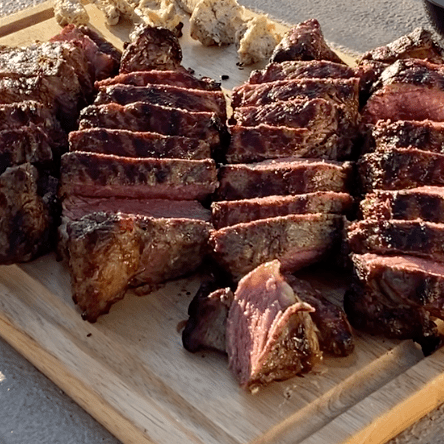
Grab a large wooden board, or really anything with an easy-to-clean surface. Arrange your sliced steak in 3-4 piles across the board, and spread the piles out slightly. Take the main sides (like cheese and bread) and create multiple groupings of them across the board. This is so that guests can easily grab the main goodies without having to reach over everything and everyone else. Put piles of your other ingredients across the board, and don’t forget to put your little bowls with sauces out and small knives to cut through cheeses.
For the ultimate enjoyment, you can put everything out on your board beforehand, and lay the steak out last. People can grab it while it’s still hot!
Eating steak has never been more beautiful.